

MCP Server
Introduction
The AAArdvark MCP server connects your AI assistant directly to your accessibility data. Once it’s set up, you can ask Claude, Cursor, Codex, or any MCP-compatible tool to pull up issues, get fix guidance, update instance statuses, and more, without leaving your editor.
When your AI assistant recommends a fix, it’s following AAArdvark’s own curated guidance, not guessing.
Supported AI clients
The MCP server works with any client that supports the MCP standard, including:
- Claude Code (Anthropic’s CLI)
- Claude Desktop
- Cursor
- Codex (OpenAI)
Generate an MCP token
You’ll start by generating an MCP Token. Each connection uses an MCP token tied to your AAArdvark account. Here’s how to create one:
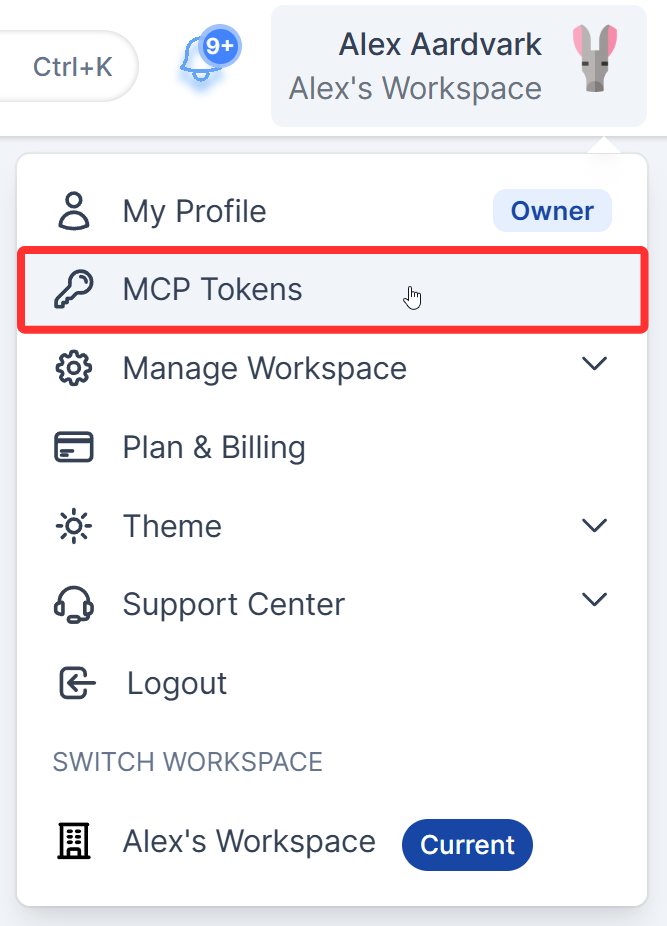
- Click your name or avatar in the top-right corner of AAArdvark and select MCP Tokens.
- On the MCP Tokens screen, under the Generate a new token section, add a token name and click Generate Token.
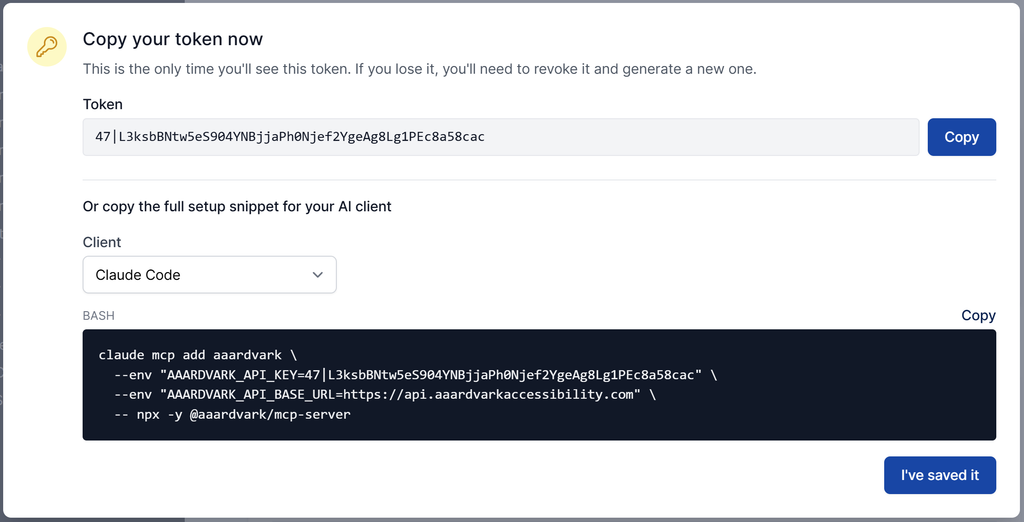
- On the Copy your token now screen, copy the token value. This is the only time you’ll see it – if you lose it, you’ll need to revoke it and generate a new one. Or choose your client from the dropdown and copy the generated setup snippet. It already has your token and server config filled in, so there’s nothing to type by hand.
- Click I’ve saved it to confirm.
Keep it secret. Your MCP token grants access to your AAArdvark workspace. Don’t commit it to version control or share it in plain text.
Connect your AI client
Every client needs the same two values: your token as AAARDVARK_API_KEY and the API host as AAARDVARK_API_BASE_URL, but the format the app generates is different for each one.
Claude Code
The generated snippet is a ready-to-run terminal command, not a file edit. Paste it into your terminal.
claude mcp add aaardvark \
  --env "AAARDVARK_API_KEY=your-token-here" \
  --env "AAARDVARK_API_BASE_URL=your-api-base-url-here" \
  -- npx -y @aaardvark/mcp-server
Claude Desktop
Add the generated block to your Claude Desktop config under mcpServers.
{
  "mcpServers": {
    "aaardvark": {
      "command": "npx",
      "args": ["-y", "@aaardvark/mcp-server"],
      "env": {
        "AAARDVARK_API_KEY": "your-token-here",
        "AAARDVARK_API_BASE_URL": "your-api-base-url-here"
      }
    }
  }
}
Cursor
Add the generated block to your Cursor config under mcpServers.
{
  "mcpServers": {
    "aaardvark": {
      "command": "npx",
      "args": ["-y", "@aaardvark/mcp-server"],
      "env": {
        "AAARDVARK_API_KEY": "your-token-here",
        "AAARDVARK_API_BASE_URL": "your-api-base-url-here"
      }
    }
  }
}
Codex
Add the generated TOML block to your Codex config.
[mcp_servers.aaardvark]
command = "npx"
args = ["-y", "@aaardvark/mcp-server"]

[mcp_servers.aaardvark.env]
AAARDVARK_API_KEY = "your-token-here"
AAARDVARK_API_BASE_URL = "your-api-base-url-here"
Once your client is configured, restart it if needed, then try asking it for any detail, such as listing your AAArdvark sites. That’s usually enough to confirm the connection is working.
What your AI assistant can do
Here’s what’s available once your AI assistant is connected:
Sites and workspaces
- List all workspaces you have access to
- List all sites within a workspace
- Get a summary of a site’s current accessibility status
Issues
- List all issues for a site, filterable by status, priority, severity, and WCAG success criteria
- Browse the full catalog of failure types AAArdvark can detect
- Get detailed fix guidance for a specific issue type
- Look up a specific WCAG success criterion by number, or browse every criterion at a given level (A, AA, AAA)
Instances
- List all instances of a specific issue, with an optional filter by page path to narrow to a specific URL
- Filter instances by provenance:
automatic(scanner-found) vsmanual(logged by a person through Visual Mode) – useful if you only want to review one source - Each instance in a list includes a
seen_on_pages_countshowing how many pages that instance appears on – useful for understanding how widespread a fix will be - Get full details on a single instance, including its selector, code context, and the complete list of pages where it appears
- Update an instance status and bulk update the status of multiple instances at once.
Manual review
Some issues can’t be fully verified by automated scanning and are flagged as needing manual review. The MCP server surfaces this state so your AI assistant can flag them accurately – each issue includes a plain-language advisory when manual review is required, and each instance has a needs_review flag. Use confirm or dismiss to resolve them.
For AI assistants that support browser automation (like Claude with Agent Browser), this is where the MCP server gets particularly powerful. You can ask Claude to open the page, test the flagged element directly, and report back with a verdict – then dismiss false positives right from the same conversation. What would otherwise take hours of manual spot-checking on a large site can be delegated to the AI.
Bulk dismiss safeguard. If you ask your AI assistant to dismiss a large batch of instances without testing them first, the MCP server is designed to push back and flag that those instances haven’t been verified. It’s a guardrail to keep you from accidentally dismissing real issues.
Pages
- List all pages being monitored on a site
- Get all issues found on a specific page
Scans
- Trigger a new scan on a site. If a scan is already running for that site, a second trigger is rejected rather than queued – wait for the first to finish before starting another.
- Check the status of a running scan
- List recent scans for a site
Assign and comment
- Assign an issue to a developer on your team
- Add a comment on a specific instance
Manage your tokens
You can see all your active tokens on the MCP Tokens page. To revoke one:
- Go to MCP Tokens from your user dropdown.
- Find the token in the Your Tokens table.
- Click Revoke.
Access stops immediately. Any AI client still using that token will lose connection.
Lost your token value? You can’t retrieve it after the initial setup, but you can revoke the old token and generate a new one. Just update your AI client config with the new value.
Related Guides
-
Outgoing Webhooks
-
Setting Up an Outgoing Webhook
-
What’s Inside Each Webhook Message
-
Verifying Webhook Signatures